Sunday, April 19, 2015

Birthday Gifts From The Hubby

Hello Scrappers and friends! My husband is wonderful when it comes to my hobby and told me this year I can order from Close To My Heart and get a few stamp sets and then on top of that he was taking me to Michael's which it so happened to be on a weekend of their big sale! Love getting new supplies! I admit I'm a little spoiled! Here is what I got.


 This was my first time ordering from Close To My Heart and I'm really glad I did! The stamps come in these cute plastic sleeves which is great for storing them and they are really durable! The sets I got are "Country Born" "Fabulous You" "Monogram G" "Spring Banner" "Forever In My Heart" "Blooming Heart" and lastly "Typed Note". A lady was nice enough to send me some catalogs so I could look through them and order whatever I wanted. I'll definitely be ordering more sometime in the future!


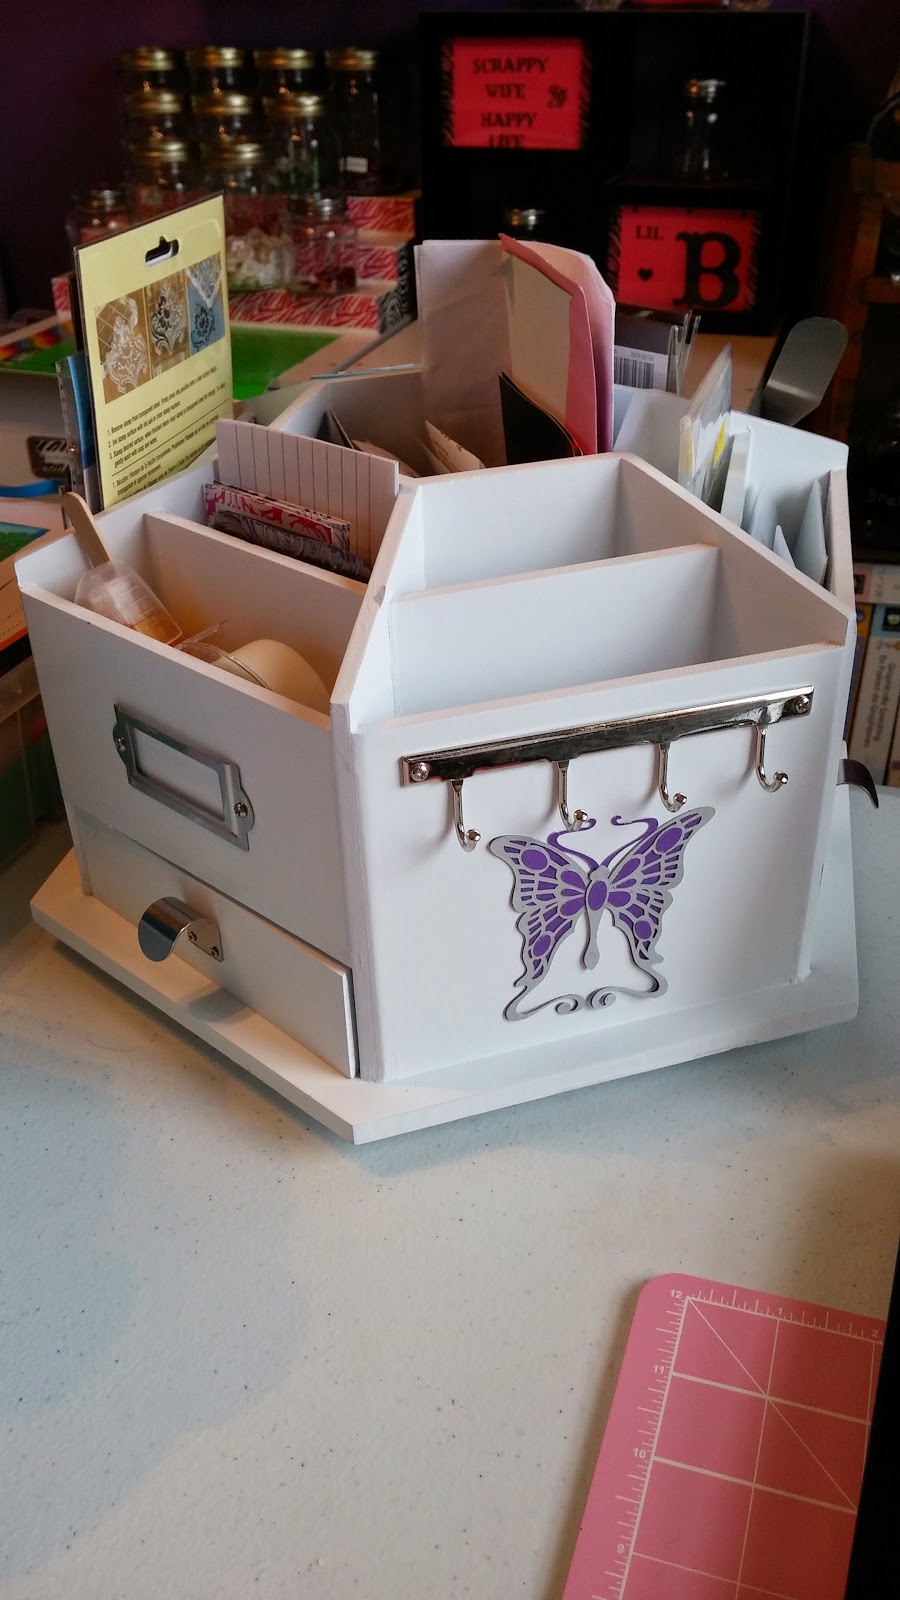
My haul from Michael's! Vinyl, stamp sets, bling, album, Copics, embossing powder, Spinning Carousel and some Tim Holtz foam replacements for my blending tool. Lots of stuff! That spinning carousel is amazing and everyone should have one!


It has a stretchy band on the one side for pens or whatever you'd like!


It has some little drawers on a few of the sides that you can place items in. In this carousel I put all my tools that I use all the time and whatever else I plan on using all the time.


I took this butterfly that I made awhile ago and placed it on the side for a little decoration. My husband said to decorate it with Vinyl, man he really does pay attention! The hooks on the sides are awesome as well and really cute, I'm not really using them yet but still a great idea! I love this thing!

This stamp set is awesome! I love animals and our cat, so this set is great. The brand is Art Impressions and there are many different kinds and designs. You can get them at Michaels, Amazon and even on Walmart.com! I'll be keeping these sets in mind when I want more clear stamps.


So thanks to my awesome hubby I am one happy scrapper! He is sooo good to me and I love him so much! He knows how much this hobby makes me happy and how I love to get new supplies. I'm lucky to have him in my life! Love you sweetie "This much and much more!"

Hope everyone enjoyed my deals I got and I hope you have a splendid crafty time!

Layouts I've Done Over The Weekend!

Hello Scrappers and Friends! Its been a pretty awesome weekend, hope yours was as well! My husband told me I could order some "Close To My Heart" stamp sets for my birthday last weekend and I received them earlier this week so I got to play with them this weekend.  Plus he took me to Michael's for my Birthday, so I think I'll keep him around! I'll post here in a bit showing what I got.

Anyways, this weekend I scrapbooked a few pages using pictures from a friends wedding that was last year in August, yeah I'm a little behind. So enjoy!


This is a simple layout I did of the wedding party. By the way, I love bling!
I used one of my stamp sets from Michael's and then cut it out. I used my Crop-A-Dial and made it look like a tag. I then took baker's twine and placed it all around the edge of the paper using a 2 way glue I have. Plus since I love bling so much I used it all around the page.


I did a page with the Bride dancing with her dad and the Groom with his mother. I cut out the Mr & Mrs with my Cricut.


I used one of my new Stamps from the Close To My Heart set "Forever In My Heart" and inked it with Tim Holtz distress ink "Seedless Preserves". I took my Chevron embossing folder and embossed some grey paper and placed that on the page. I used some adhesive pop up foam squares and placed those behind the heart to make it 3D. I took some grey and purple bakers twine and placed it across the chevron paper. I then took some purple gems and placed those on the ends of the twine.

Here I used a few chipboard pieces from the 3 Birds Studio set I got from HSN and placed them on the page. Then I did this knot I used to do as a kid and did a whole strand of them using the purple and grey bakers twine braiding them together basically. I glued the strand around the chipboard piece using the 2 way glue again. 


Another one of my creations I did this weekend. I cut the "Lovely" out using my cricut.


Used a few of my Copic markers and a stamp from Close to My Heart "Blooming Heart". I inked it first with black ink and then colored it in. Then used a stamp "sweet" from a set I got at Michaels over that.


Using the same stamp set from Michael's I took this banner stamp and inked it with Tim Holtz distress ink "Pickled Raspberry".


I used the "Spring Banner" Close To My Heart stamp and then used a Michael's stamp "the simple life". I used the "Pickled Raspberry" ink again, although it turned out a little blurry I think it looks alright. I just traced around the inked image with a black pen to make the image stand out more.


 Lastly I did a layout of them cutting the cake and shoving it in each others faces! The "cut the cake" I cut on my Cricut. Then I just used multiple mats behind the pictures. Simple layout and I love how it turned out!


These two are so cute together. I hope them many wonderful years together and thanks for including me in your wedding! Love you guys!


Hope you all enjoyed these layouts and it gives you some inspiration! Have a splendid crafty time!

Saturday, April 18, 2015

New Video Showing Stamping

Hello Scrappers and Friends! Hope you enjoy my new video! https://youtu.be/ADFwsb23_g0

Have a Splendid Crafty Time!

Sunday, April 12, 2015

My First Video Showing Different Types of Embossing

Hello Scrappers and Friends! Today I made my very first video showing the differences between "wet" embossing and "dry" embossing. Enjoy and Remember to have a Splendid Crafty Time!

https://youtu.be/MF13C1AaojE

Sunday, April 5, 2015

Easter Card

Hello Scrappers and Friends! Today I made a quick Easter Card for my Grandma. I need to plan better so I can do more in time for the holidays!

I used my eyelet setter again today only messed up one eyelet but so far I love it! I took some bakers twine pink & purple colors and braided it together to thread through the eyelets. The eyelets are so cute and were so perfect for Easter!

I did most of the cut outs on my Cricut Explore. Just typed in Easter in the search bar and this is a few of the things that came up.

I used a Stampin Up Stamp I had and stamped it on white cardstock then used my Copics and colored it in. Loved how it turned out!

My husband and I hand wrote our names with an embossing pen and I used Silver embossing powered to create a raised image with my heat tool. 

Love using different techniques on one project. Still learning each thing I did but practice makes perfect! My grandma loved the card so that's all that matters. Hope you have a splendid crafty time!


Friday, April 3, 2015

Birthday Card

Hello Scrappers and Friends! Today I tried out my Crop a Dile for the
first time, still have a lot to learn but I love it! There are a few birthday's coming up so this card will be perfect for someone.

What I did is I used a chevron embossing folder and embossed the
front of the card with my Cuttlebug. Then I took Tim Holtz inks "Mowed Lawn" and "Salty Ocean" to do the background using my Tim Holtz Blending tool to blend the 2 inks. Love the way that turned out.

I then took my Crop a Dile and punched 4 holes for my eyelets. Once I had those punched out I used the Crop a Dile to place the eyelets. I took baker's thread green and blue and threaded those through the eyelets and taped the ends on the back of the cover. I then took my Martha Steward "Happy Birthday" punch and did the greeting. I placed a piece of dark green card stock on the back to not only help cover up the eyelets and bakers thread but to help the "Happy Birthday" stand out.

I took a piece of small decorative tape and created these flags on the baker's twine. I placed glue dots on the back of the flags so they stay put.

I got on the Cricut Design Space and searched for Birthday Images and got this "Make a Wish" cut out. Once that was cut out I sent it through my sticker maker then used my embossing pen and embossing powder to do the trail behind the star also the silver near the folded edges and did some on the star as well on the "Happy Birthday".

Now one thing scrapbooker and crafter love about embellishments is that they
cover up "mistakes". I tried stamping a cake design in the middle of the card and did not like it. I took 2 flowers and layered them using glue dots to adhere them to the card and cover the stamped image as much as possible. Everyone loves bling so I added those little jewels to the flowers. Those jewels are from Michael's and are located in the bins near the registers, their dollar sections.


After all that the card is pretty much complete besides the inside. Love the way this card turned out and I can't wait to give it to someone special! Have a splendid crafty time!

My First Crop A Dile!

Hello Scrappers and Friends! I just got my first Crop a Dile from HSN. I have been wanting one of these babies forever now so I was super excited when I seen the deal they had on the HSN 24 hour craft event!

Black bar moves
Those that do not know what a Crop a Dile is or what it does I'll tell you. A Crop a Dile is a handheld tool that uses Eyelets. Some crafters
use eyelets to thread ribbon or bakers thread through. When you make homemade journals or scrapbooks you hold it all together with rings and the eyelets help support the rings so they don't tear through the paper, makes it stronger. I have
Different Eyelets
even seen eyelets used on banners for parties. There are several kinds of eyelets and a few different sizes.

The deal on HSN not only included the Crop a Dile but it came with tons of eyelets and a case. The case is pretty awesome and has little compartments for some of your eyelets. I put the washers in the compartments too but I can see them going everywhere in the case since the compartments don't go all the way to the lid and seal. I also cut out the diagram showing the different settings from the
instructions and used my little tape runner and stuck them on the bottom of the case so I have something to refer to when using different eyelets.

Back of eyelet

Front of eyelet
Now the Crop a Dile does 2 different punches as well depending on which size eyelet you use. There is 3/16th's and 1/8th sized holes and you can adjust the depth by moving the little black bar so that you could get the same depth each time.


Some eyelets come with washers. What the washers do is they create smooth surfaces on both sides. You will see I did not use a washer on the card I made but I knew I was going to cover up the back with a piece of paper so that was fine. What the Crop a Dile does to the eyelet is it smashes the back of it to fit around the paper, fabric etc to hold it in place.

This is the 8/16th hole punch and the other side has the 1/8th one.
Love what this tool does and I'm excited to do more things with it!
Hope this helped anyone that has been wanting one or anyone that had no clue what it does. If your wondering how I made this card, stay tuned, I'll be posting the details on that in another post! Have a splendid crafty time! 


Thursday, April 2, 2015

First Projects Using Iron On Vinyl

Hello Scrappers and friends! When I first got my Cricut Explore I used Iron-on vinyl for the first time and I loved it! A lady on Facebook posted a sweatshirt she had designed and I just had to make myself one as well!

I told everyone about this machine and how many different things I can do with it. A guy I work with asked if I could make him a shirt for his "dream" automotive business. So I said sure why not, it would give me more practice anyways. He bought a shirt and gave it to me and told me what he wanted it to say on it. I went home to design it and cut it out. After you cut it out be sure to get all the unwanted pieces off, this is called "weeding". Before I ironed it on I took a picture of it and sent it to him to make sure it's what he wanted. Here is the final product.

Now a few tips I learned when ironing this on is:

 1. When ironing on the vinyl be sure to move the iron around and don't hold it in one place because it will cause the plastic liner to melt to the iron and it's not fun to peel off 
2. If you hold the iron in one place and keep it there it can cause the letters or design to crinkle and melt.
3. When cutting out the vinyl on your Cricut be sure to have the shiny side down on the mat and the dull side up
Shiny side
4. If you iron on your design in parts be sure to place or keep the plastic covering over the vinyl that you had previously ironed on before you try to iron on the other part because if you try to iron near or over the other it will come off and melt/crinkle. 
5. When I ironed it on I took the very tip of the iron and rubbed it over the letters constantly moving the iron until I see the fabric lines starting to show on the vinyl so that I knew for sure that the letters would stay

Dull side
My Cricut also came with instructions on how to use the Iron on Vinyl. They said to have your iron on the Cotton/Linen settings and to preheat the area you are planning on placing your vinyl by taking the iron over that area. They also recommend you use a towel or something to put over the plastic before you iron it and then iron on the towel so it will protect your material. Do NOT use steam either. Also they recommend flipping your shirt or whatever your ironing onto over and iron the backside of the material. Once it's cooled gently peel the clear plastic liner off and it should leave your image on the material.

The truth is, this is probably the 2nd time we have used our iron EVER.  I'll probably be the only one using it for my shirts I design. I still have lots to learn and need practice on using Iron on vinyl but I love doing it! It's addicting so beware crafters! Your going to want to put vinyl on everything!

Before I Ironed it on
Hope this helped and I look forward to showing you all more of the items I do. I'm planning on doing shirts for my mom, grandma and I to wear when we go to garage sales. Have a splendid crafty time!